
AKA, my top five DIY/upcycled seed starting options! (Scroll down for a list!)
Last time I reported how I was going to be starting about 300 seeds indoors. That’s a lot of seeds for me, and seed trays can be a bit pricey. So recently everything I’ve been looking at has started to look like a seed starting cup. That novelty glass jar? Maybe I can drill a hole in the bottom and… The tray that holds the custom-painted ornaments I gave Greg this year could just have some holes punched in it and… You know, the top to that board game box is nice, sturdy cardboard just the right depth, and if I planted the seeds in rows… It’s getting out of hand. Everything I look at, whether it’s important, in use, impractical, or not, I can’t stop thinking about cannibalizing it into a seed starting cup! Yikes!
Every year I buy a combination of peat and plastic seed trays in small quantities to add to my collection. I weigh a few things when I buy seed trays. Cost is the first. I don’t wanna be spending a crazy amount of money or I might as well be buying my own veggies, not growing them. Sustainability includes economic sustainability, and I aint in the 1% here! Second is environmental sustainability. Peat trays seem great on the surface… Biodegradable, made from renewable resources… But there’s an environmental cost to everything and a balance must be struck. Peat has to be grown, harvested, and processed into pots. And the equipment required to do that relies on fossil fuels. It’s like how even if you recycle a plastic bottle, it still takes fuel to recycle the bottle so it’s better to have not used it the first time. So peat pots have a footprint from being manufactured. Plastic pots and seedling trays have a higher footprint, but unlike peat pots are reusable. When the ecological impact is divided across several years and the plastic is ultimately recycled, plastic could easily be the better option. Even in a perfectly balanced world, there’s a level of plastic that is sustainable to have in production.
The other thing about peat trays is how they effect livability of plants. Since my soil is lacking in peat, every little bit counts and when I plant my pots I tear the bottoms off but leave the tops in tact. This creates a peat pot ring around the top of the plant stem that helps prevent bugs from attacking them. Plus it adds peat to my soil when I crumble the bottom half into the dirt, right where the plant needs it the most. On the other hand, plants whose roots hit the edge of a peat pot often become stressed and unable to grow further, desperately trying to push through the compressed peat. Don’t believe the lies that the roots will grow right through the pot nd you can plant the whole thing in the ground… They won’t! And it will strangle your plant’s growth. In a plastic pot, those roots simply turn and start growing around the pot in spirals, allowing the roots to uptake more nutrients and water to continue growing (but also creating a tangle of roots). It’s a bit of a trade-off. All around, it just kind of comes out as a wash to me. But I like to give it some serious consideration none the less.
One way or another, buying pots costs money and no matter what I do, a manufactured seedling pot comes with a footprint. So I’d much rather have things that were already made for another purpose and upcycle them into something I can use again! So here’s some great upcycling ideas for seed cups and pots! This is a list about from smallest to largest, because size is very relevant in seed starting pots. If you want to grow your plants for 10 weeks indoors, a larger pot might be better. If you are going to transplant them very quickly, use a smaller pot. I hope it helps give you some ideas!
Toilet paper rolls

TP and paper towel rolls make for nice, tiny, seed starters. The fact that they are cardboard is nice, you can use them much like peat pots, in that they will wick moisture up through them to keep the plants moist if the bottoms are set in water, without over-watering. I wrote a whole post about how to make and use TP rolls as seed starters way back when I first started homesteading.
Since then I’ve learned a few things about them that are worth noting. One, the ones made from half of a toilet paper roll are smaller than the ones made from 1/4 of a paper towel roll. They might even be too small. Two, they dry out VERY fast, and must be kept in trays with water at the bottom to stay moist. In some places they can develop slime or mold this way, but I haven’t had that happen much. Three; they are VERY small, and as a result, some plants need bigger seed cups or they need to be transplanted at least once before they go outside. So bear those facts in mind as you grow in cardboard tubes. However, once those facts are accounted for they can be quite effective, in abundance, super easy to make, and freeeeeeee!

TP roll seed starters and peat pots, in a plastic tray so they can sit in water 24/7
Bonus!
Empty wrapping paper rolls! These are exactly like the toilet paper rolls, but bigger. They are cardboard, made the same way, wick water the same way and have all the same benefits and problems. But they’re bigger!
Yogurt Cups

Yogurt cups (or similarly sized plastic cups) with holes punched in the bottom make good, reusable seed starters. Plastic doesn’t wick water upward like cardboard or peat does and so they need to be watered with more care. But they also don’t necessarily need to sit in a tray filled with water at the bottom either. If you use a good peat-heavy soil with enough holes in the bottom, you can actually bottom water with them too. If you’re worried about your soil mix falling out the bottom from drilling too many holes, just use a small square of paper towel to keep the dirt in but still allow a good transfer of moisture and air.
Butter Boxes
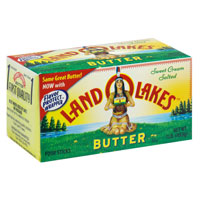
A butter box is just the right size to start seeds in if you trim off the top, or cut it in half. They’re very similar in size to some commercially sold seedling trays. Because they are cardboard, they will wick water like other boxes, but they are covered in a laminate coating, so it will be less effective. This also prohibits mold growth, but can’t be planted into your garden like brown cardboard can. It takes too long to break down.
Similar to this would be pint, half pint and quart dairy (creamer/cream/milk) cartons.
Newspaper Pots

In 2014 (my god, is that really 3 years ago already???) I tried out these DIY newspaper pots from mother earth news. I hated them. They fell apart constantly. I have since learned about these much more awesome DIY pots that are folded origami-style. Anyone who has ever folded a paper crane will find these to be incredibly simple, but admittedly, they are slightly more difficult than the simple rolled paper ones. However, they hold up SO much better! There are 15 steps in folding this, and it’s no harder than folding a paper airplane. Just give it a try!
DIY folded seed pots!
DIY origami newspaper pots
Make sure your newspaper uses non-toxic ink. Do not use glossed pages or ads, they are often printed by another company and contain different inks/coatings. I get my newspaper from my dad who lives here in Cleveland with me. He gets The Plain Dealer, which uses recycled paper and soy-based ink. Thanks CPD!
These function much like cardboard and peat pots in the way they wick water, but are MUCH more likely to break down rapidly in the soil, and so are much more reasonable to plant in the ground whole if you want a pot you can plant. (Although I still advocate taking the bottoms off.)
Disposable Cups

If you’ve held any big gatherings recently and have all those dirty, old, disposable cups lying around, just give them each a quick rinse in hot water and punch some holes in the bottom. These big cups provide a great place to plant seedlings that might need some extra root space, whether this is due to a long tap root (like corn) or growing a big plant (like mammoth dill), or even leaving extra room on the top for more dirt (like a tomato plant).
And that’s it! That’s my top list for DIY and upcycled seed starters! Seed starting can literally happen in any container with drainage at any time, these just happen to be my absolute favorites. Good luck gardening and may your germination rates be high!

I have used toilet paper rolls, then transplant them into half gallon milk cartons cut in half. I collected them all year long. In the end, at one point, I had about 50 or so seedlings. The toilet paper rolls were put in seedling trays and identified in sections with the name written on a popsicle stick. 🙂 I had a friend who gardened on large scale (they had 10 children to feed!) and he always used yogurt cups every single year. Just washed and sanitized year to year.
Very informative! This is also a solution to help our environment right? Your a good example for all people, keep it up!
Yes, this allows for paper products to end up adding biomass to your garden beds and give plastics more uses before ultimately being recycled.
But I don’t know that I’m such a good example for all people. 😛
This web site doesn’t show up appropriately on my apple iphone – you might wanna try and repair that
Hi, not sure if this is spam or not… But in case it isn’t;
I run this blog through WordPress.com. I do not have direct control over the coding, or I assure you it would function perfectly (and probably look worse). If you’d like to contact WordPress’s customer support about your issue, I encourage you to do so. But I’m afraid there’s not much I can do about your problem.
You could also download the wordpress app and simply use that through your iphone, since a lot of coding is not designed to function on apple mobile products anyhow and requires special apps to work because of the iphone’s design. (No fault of the coding, really, works fine on androids.)
Best of luck.